Press Printed Photo Books
June 1, 2011 at 2:12 pm | Posted in Photography | Leave a commentTags: Arizona, Books, Custom Photo Books, Design, Designer, Digital, Phoenix, photographer, Photography, Press Printed Books
Modern technology is great. No longer do we have to stuff photos into pre-sized plastic slots in a traditional photo album, or worse yet; stick them into those “magic magnetic” albums that turn everything yellow over time. We have better options.
One of those options is press-printed books, and it is one of my favorite things to do with pictures. It is like “scrapbooking”, only it takes place in the digital realm and the pictures are actually printed onto a page with high-tech printing presses and then bound together to be a one-of-a-kind coffee table style book.


No more loose pictures, no more yellowing, no more cutting out hand-written captions and glue-sticking (yikes! art-destroyer alert!) them to a page.
Press books can be as simple as you want, or as elaborate as you want. The covers can be fabric, leather (real or faux), or have a photo printed right on them! They can also be a combination of the above…perhaps leather with a cutout to reveal a photo below.
They differ from a traditional wedding album in that they aren’t actual photos printed on a photographic paper and then bound to a page. They are printed on the page, and that page can be matte, glossy or pearlescent. The choice is yours. Artwork and captions can be added easily, during the design phase. Once again, they are printed right on the page. The pages are designed as a single image, and it can span across pages if you want. The images above are what they look like during the design phase. Each image is spanned across two pages. If you would like to see the images as they appear in the actual book – check my facebook page.
Canvas Prints – Big, Bold, Beautiful
May 31, 2011 at 2:15 pm | Posted in Photography | Leave a commentTags: Canvas Prints, Color Enhancement, Fine Art, Large, Photography, Services
One of the products I offer is canvas prints. They come in all kinds of sizes, from small to huge. A big advantage of canvas prints is that they don’t require framing, which can get really expensive with large pieces; especially if they are a non-standard size.
Canvas prints are a great way to feature one of your prized photos of the family, or display a beautiful vacation photo prominently in your home or business.

Sedona Storm Sky - Example of Image Enhancement
There are many places you can get canvas prints made from photos you already have, but there are a lot more options and benefits if you have it done through a professional photographer like me. High quality canvas prints come with a dizzying array of options available from size, to depth, to canvas thickness, and special coatings to protect them from hazards like UV and fingerprints.
If you drop off a photo (digital or printed) at your local megamart and have them turn it into a canvas because it is cheap; you are probably not going to get the best quality you can. Quality counts on large pieces! You want the best you can afford, and it helps to discuss your options with someone who understands them and can make suggestions based on where you want to hang the piece and the impact you want it to make.
You want the piece to be big, bold and beautiful. Not big and cheap-looking.
Another drawback to using a drop-off service is that most of the work is done by machines and humans that aren’t looking out for your best interest. They are just running the piece through the mass-production-mill. Things like color balance might be adjusted, but they aren’t adjusted by hand to accentuate the piece itself; they are adjusted to a one-size-fits-all “best case scenario”.
In the photos above, you can see that the colors and tone of the picture (not to mention the dimensions) were adjusted to precisely what I wanted them to be. I could do this, because I took the time to find out where the piece was going, and the statement it was supposed to make. A photo that is going to end up almost three feet wide needs to be treated differently than something that will be six inches wide and tucked away into a photo album. One will get seen by everybody, all the time. You must keep that in mind.

Sedona Storm On Wall
Sedona in HDR
March 15, 2010 at 2:04 pm | Posted in Blogging, Flickr, Photography | Leave a commentTags: Arizona, Blue, Caterpillar, green, HDR, High Dynamic Range, Jerome, Mine, Mountain, Photography, Red, Sedona, Tractor, Trucks
This weekend I went to Sedona for a wedding. So, of course I took my cameras. I decided early on I was going to shoot it a bit differently than I normally do, this time. I set the trusty Canon to Aperture Priority and turned my Auto Exposure Bracketing on.
Three shots, spaced between 1 and 2 stops apart. That was how I shot everything. Why? Well, Sedona is famous for its red rocks and blue skies. Since it had just rained, that meant lots of greens on top of the reds. Add to that some puffy white clouds and shadows and you have a lot of dynamic range to try and capture with a digital camera. I wanted to see if I could accurately capture all the mountain details without blowing out the sky or resorting to any camera filter other than the circular polarizer I brought along.
Now, I’m not going into all the details of HDR (High Dynamic Range) photography, bracketing (AEB) or why the mountains are red. I’m just going to say it was a great time and share a couple of shots with you.
-
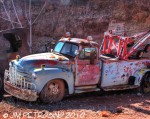
- Antique Wrecker in Jerome Ghost Town
-
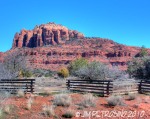
- Mountain in Sedona
-
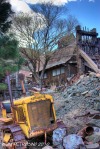
- Tractor at Gold King Mine in Jerome
If you have seen HDR before, you may be expecting to see really vivid, almost cartoonish colors here. You won’t. This is a real landscape and the bracketing and HDR composites have been made with that in mind. I wanted to show you that HDR doesn’t have to look surreal. It can be used to capture and display all the details your eyes see. As I mentioned, in Sedona that means lots of red, green and blue. It just so happens to be colors your camera is made to capture. The bracketing is perfect for sucking details back into the pictures.
How I Take Lightning Photos
September 10, 2008 at 10:42 am | Posted in Flickr, Photography | Leave a commentTags: Lightning, Photography, tutorial
First off, let me tell you that this is not a definitive tutorial on the “right way” to take lightning photos!
This is just how I have done it lately. Early on, I did it the harder way…stand in the pouring rain and point your camera around with the shutter open for as long as it can, or as long you think you can hold it somewhat steady. My first lightning photo was taken this way, and I’ve been trying to improve on that since.

This latest photo, was done using my now preferred method.
I wait for the evening monsoons to roll into the Phoenix area, then I grab my Canon 20D (which hopefully has a full battery charge), a fresh memory card, and my tripod. Oh yeah, and the Wireless Remote Control for the camera. Oh – and the stone bag for the tripod.
What’s a stone bag? Well, its pretty much what it sounds like. Its a three sided canvas bag that clips onto my tripod legs. When the tripod is standing, and the bag is opened – you can toss stones, dirt, water or whatever else might be on location into the bag to add weight. Essential concept if you have a thousand bucks sitting 6 feet above the ground in a decent wind!
Ok, so now the tripod is set up, camera atop it. Stones in place. I point the camera towards where there is lots of lightning. Then I fumble with the controls since it is dark and get the camera set to manual. Lens Focus to Manual – infinity. Aperture to around f8 as a starting point. Shutter to around 15 seconds. This setting allows me to click the shutter a few times without seeming like forever to see if I got any lightning strikes into the camera. With any luck, I have a couple of shots out of 20 that have some strikes. This allows me to see if I need to crank the aperture up or down.
If the bolts are really bright, I may go down to like f11 or if they are far away and quick – maybe bump it up to f5 or so. All depends on how much light is getting in, and how fat I want the bolts. Remember – the shutter is open for 15 seconds and the bolt is pretty darned quick so its 15 seconds of ambient light (street lights, porch lights, headlights, what have you) trying to balance out a blast from the sky that is about a gazillion times brighter, only really fast. Keep in mind when you get to your computer and load these images up for viewing at full resolution 2000*2000 or whatever you are shooting at – all this ambient light will create noise problems. That’s a different story altogether…
So, back to the shots. I started at 15 seconds, f8. By now I have determined how bright the bolts are after a few captures, and adjusted aperture. Now, I can switch the camera to bulb mode and vary the length of shutter. If I get lucky, I open the shutter and BAM! Lightning bolt. Close shutter. Usually, it is open shutter, wait…30 seconds later figure the shot is doomed to noise hell close shutter…BAM! Lightning Bolt.
If there is one thing for sure when snapping lightning photos, the best bolts WILL happen right after you close the shutter. Or, right after you turn the camera in another direction there will be a bolt that splits into 50 fingers that would have filled your megapixels with glory, had you not got impatient and pointed away.
So, that’s it. A little methodology…a lot of luck. As for other details like ISO – I start at around 200 and go up from there. The higher I go, the shorter my shots are. No ISO 1600 shots for 5 minutes. Bad idea, at least with my camera. Perhaps you have a better one.
Oh yeah – safety. This is an inherently risky hobby. That’s why I am not telling YOU how to do it. I am telling you how I do it. But, in the sake of safety – a great way to do it would be to find a parking garage where you can see lightning from and shoot from the 2nd highest level, so you have a roof over your head to protect you and the gear from rain and death. If you find a parking garage that is unguarded, surrounded by cool backdrops that are photogenic at night…good for you. I haven’t found that yet, but I read somewhere on the net that it is an excellent way to do this safely.
Seriously. Standing in a thunderstorm with a thousand bucks or more standing on a metal tripod is risky business. If you can’t hear the thunder but are getting good shots…stay at it. If you hear thunder when you see the bolts…pack up and go home. If you are lying down on the ground and shooting the bolts directly above you…please write up a quick note willing your gear over to me after your death. Have it notarized.
So, that’s it for now. Check out my flickr pages on weather for some shots…
Looking for an all-around great camera?
August 19, 2008 at 1:32 pm | Posted in Photography | Leave a commentTags: Camera, Gear, Olympus, Photography, SP-560UZ, Zoom
It seems that I am getting a lot of my traffic from people doing searches about the Olympus SP-560UZ. So, I figured I would write a little about it.
It is a great camera, with all of the cool features many people crave. Sure, its not going to fit well into your shirt pocket, but it actually it fits pretty well into the pockets on your cargo shorts, if you are traveling with it! It’s also fairly light, so it’s not a bother to lug around all day while sightseeing. However, it is heavy enough to let you know this is a real piece of camera gear.
The optics are great. It goes from 28-476mm, although EXIF data from it reports much wider than that at times, not sure why. It does face detection, has Image Stabilization and a pretty awesome image processor for really vivid colors. It will go up to ISO 6400 under certain conditions, but realistically count on ISO 800 as being your real ceiling. Be prepared to do some image noise reduction with software after you download shots taken that high! ISO 400 is pretty usable, though, especially if you are making web photo albums, or standard size prints.
As for capturing fast-action stuff – no problem, as long as it is well-lit. It will click along at 1.2fps in high-res mode (in jpeg format – raw shooting takes forever to write the XD card, a pretty big drawback if you plan on shooting RAW mode). If you don’t mind dropping down to 1.2 megapixel resolution, this thing will crank out 15fps! Seems like it does video too, but I can’t recall ever using that mode on purpose.
If you are a scuba diving buff, or a surf-photographer, there is an underwater housing available for it. My buddy has one, and it is very cool. Be prepared to spend as much on that as the camera, though.
So, do I recommend this camera? Absolutely. Will do everything you ask of it automatically, or will allow you to set just about any parameter you want manually. Sure, if you a an advanced photographer – there will definitely be limitations. That’s why I switched to a DSLR. But believe me; for general walk-around shooting of people, places and things…this camera won’t let you down!
Here are some links if you want to know more:
Happy shooting!


Create a free website or blog at WordPress.com.
Entries and comments feeds.
